|
2/24/2024 0 Comments Lazlo's Running BlogThailand Studio Build - April 2026 Before I begin, I want to acknowledge the Warp Academy YouTube channel. My broadband absorbers and ceiling cloud were built using most of the techniques they showed in the Pro Studio Makeover series. The rest comes from the Master Handbook of Acoustics (7th Ed.) by Everest and Pohlman. My testing system employed Room EQ Wizard (REW) which is available on-line. I’m not going into any depth on how to use that program as there are far more extensive dissertations on that topic available all over the internet. My Tarzana home studio was great fun, except the mixes didn’t translate well. I had a pair of first generation Mackie HR824s (that I purchased new), my vintage NS10s powered by an SAE A502 (that I also purchased new), a pair of computer “cubes” and a variety of headphones including ATMX50s and Sennheiser 650s. I had Auralex over all of the first reflection points on the side walls, the entire back wall, the first reflection point on the ceiling and had their Lenrd Bass Traps in the front and rear corners. I’d used Sonarworks Reference 4 to try to further “tune” the room. I became painfully aware of how bad my room sounded when I heard a mix I’d done for a client on a sound system in a club and - despite her raving how much she loved it - I was embarrassed I’d let that mix out into the world. I became even more aware of the room’s deficiencies when I acquired my first set of Slate VSX headphones. I’ll admit it, I’m a Slate fan. VCC was one of my first go-to plugins. Then VTM. I actually like the ML1 modeling microphone. On the other side of the coin, I’ve had a love/hate relationship with the Raven, but since V4, it’s pretty much love again. So I took a leap of faith on the VSX cans and - wow - they made a huge difference in my work product. My Jomtien villa has a bedroom that - ratio wise - looked like it would work. I plugged the dimensions into AMROC from amacoustics.com and it landed well within the bolt-area. It did have some issues, the Air Conditioner unit on the back wall, the door in the right rear corner and the window just behind the first reflection point on the left side wall. It only had 2 power boxes, both on the same wall, and only 3 ungrounded sockets between them. Plus it was solid concrete with a tile floor. I estimated it has more than a 4 seconds ring time when I clapped my hands, plus a very audible fast slap echo - an actual buzz - between the ceiling and the floor. But it was what I had, and I decided I was going to build - with my own two hands - enough absorbers to get the room into a workable state.
First step was to get a “before” capture of the room in REW. Room EQ Wizard is a free program that provides a wealth of information about a rooms acoustics. You need an omnidirectional measurement microphone and cable, a mic stand, a high quality audio interface, a computer and your studio monitors. The first scan is conducted with a single speaker placed in a corner to excite the room nodes. These are locations in the room where the sonic peaks and valleys (mostly in the low end) are most pronounced. It is very easy to hear these nodes when playing low frequency content and walking around the room. Where the sound waves from the speakers arrive in phase with the waves reflecting off the rooms surfaces, the bass gets noticeably louder. When they arrive out of phase, the bass drops out. Higher frequency sounds also suffer from phase cancellation which causes comb filtering and diminished spatial clarity. The empty room REW graph is very helpful in calculating how much absorption is going to be required to tame those nodes. The location of the absorption - such as at the first reflection point where the sound from the monitors bounce off the side wall and ceiling and then converge at the listening position - is also crucial.  Next, using the information I had, it was time to ascertain the best listening position. Doing so helps minimize phase issues, and provides for a proper stereo image with an accurate phantom center. The general rule of thumb is that the position should be equidistant from the side walls and roughly 38% of the distance between the front and back walls. I carefully measured out the center line of the room, and marked a point 38% back from the front wall. Then added 2 marks every 10 inches forward and 2 behind the mark.  Next I set up my main monitors - Barefoot 02, version 2s - on stands with their sonic centers at the correct listening height of 47". There has been much written about correct speaker placement, with some saying they should be moved away from the front wall. But most of the high end acousticians (and Barefoot’s recommended positioning guide) seem to agree that - unless you have a very large room and a ton of bass absorption on the back wall, speakers should be as close to the front wall as possible to eliminate boundary interference. (This occurs when the bass frequencies emanating from the monitors radiate rearward to the front wall and bounce back to the listening position out of phase with the original signal.) The distance between the speakers is set so that they form a precise equilateral triangle between their sonic centers and a space directly behind the engineer’s head. This creates a triangle shaped space around the engineer’s head with the optimum listening characteristics. Next, I centered my studio chair so that my ears were 47" above the floor at precisely the 38% mark. I played some of my reference mixes listening closely to the overall sound. Then I moved the chair forward and backwards 6 inches, listening carefully to the sound. As it turned out, in my room, the best sound was 6 inches behind the 38% mark. Because the position was slightly behind where I had initially set it, I then moved my speakers outward a few inches to recreate the same equilateral triangle focused on the new listening position. I then repeated listening to my reference mixes moving forward and backwards 6 inches. The new position remained the best sounding, so that became my final mixing position. Next, my testing mic was placed on a stand, facing the center of the stereo field, with the capsule at precisely 47" off the floor. The front edge of the testing microphone is placed at the precise point of the equilateral triangle. This measurement is critical and I measured and re-measured until I had it down to the millimeter.  The I ran a series of 5 sweeps each for left, right, and both speakers from 20hz to 20khz to get a pre-absorption measurement of the room, and another set from 20hz to 500hz to focus in on the critical bass range. The measurements confirmed my initial thoughts of the room’s four plus second ringing, huge low end nulls and massive comb filtering. It also showed that the window on the left side wall would rattle loudly at several specific frequencies. You will see those sweep graphs below when I compare them to the treated room graphs. Building and Installing Broadband Absorbers My Tarzana home studio was treated with Auralex foam. I am not here to bad-rap anyone’s products. Auralex has it’s uses. It is somewhat effective if installed at the first reflection point to help cut down on high frequency reflections and comb filtering. On the other hand, it is less than useless in taming bass response. I say less than useless because, not only does it provide little (effectively no) low end control, it makes people believe their room is properly treated, thereby giving people a false sense that their mixes will translate in the real world. Based on my own personal experience, both as to the lack of translation of my old room mixes, and the enhanced understanding of acoustics I’ve now acquired, I believe acoustic foam panels and bass traps best use is for packing material for international shipments. That’s what I used mine for - after pulling it off my old walls prior to repainting. I only have a few of my old 2x4 sheets mounted on fiberboard at the first reflection points in my 7.1 surround TV room. I used 2 cut up panels to stuff into the window opening between the glass and the security frame to stop the window from rattling. I'm also using a bit on some noise control boxes for my power converters. The rest of my foam panels and bass traps are now in a Thailand dump. Based on what I had gleaned from the aforementioned Warp Academy videos and a painful slog through Everest and Pohlman’s Acoustics handbook, I decided on broadband absorption for the first round of acoustics treatment. The absorbers would be mounted a few inches off the wall - air gapped - to increase their effectiveness. The front wall would not be treated, as the speakers would be set very close, and there would likely be insufficient energy reflected backwards from the rear wall to cause any issues. As luck would have it, the house had a large jungle scene painting in the dining room that I had removed when the house was painted before my arrival. It was the perfect size for the front wall of the studio. I would be building 3 different types of absorbers in various sizes. There would be 6" deep panels for the front sidewalls (which cover the first reflection points) and the entire back wall; 3" deep panels for the back sidewalls and corner trap faces, and a 3" deep cloud over the mix position with lighting features. Each of the 6" side and back wall panels would be 89" tall except for the one under the air conditioner vent which was only 73" tall to allow room cooling. 89" allowed for a mounting system using stand-off blocks and zip ties to help with air gapping. Three of the corner traps would be mounted and the space between them and the walls filled with rolls of cotton batting. The fourth would be left free standing to cover the back corner when the door was closed during critical mixing or mastering. The cloud was suspended from the ceiling with toggles and adjusted to be parallel to the ceiling. It has a variable color LED light strip on top and four variable color LED bulbs - one at each corner - that are controlled via a phone app. Each absorber was constructed from either 1x6 or 1x3 framing lumber. The local lumber yard sold 6 meter boards. I used some algebra to ascertain the total board feet I would need for each, and ordered them delivered as I only have a scooter to get around here. Total delivered cost was just over $400.  The most crucial issues when building broadband absorbers are the density of the absorption materials used and the transparency of the fabric covering. Absorption - referred to as the material’s acoustic impedance or gas flow resistivity (GFR) - is measured in “Rayels” based on its density in kilograms per cubic meter. Absorptive materials are not soundproofing. Sound waves are supposed to travel through the material. As they do, the sound’s energy (its velocity) is reduced by converting it to heat. If a material is not dense enough, the sound isn’t adequately absorbed; it simply passes through, bounces off the back wall, and returns, although with slightly lower energy. If it’s too dense, the sound is simply reflected back with only minimal diminishing of energy which actually makes the problem worse. The Warp Academy videos used Rockwool Comfortbatt and Cavityrock for which the GFR specs were published. However, neither were available here in Thailand. Fortunately, I was able to find and source Rockwool Safe and Sound 330 which, at 40 kg/m³ was slightly denser, non-reflective, and more efficient than Comfortbatt.(28.8 kg/m³) In my room, based on the GFR of Rockwool 330, I ascertained that 6" panels with 5" air gaps at the front sidewalls and back walls, 3" panels with 2.5" air gaps on the back sidewalls, a 3" cloud over the mix position, and 3" backfilled corner traps should be adequate to eliminate high end issues and reduce the low end problems to below 35hz which could be addressed by shelving filters. The acoustic fabric’s transparency is measured in percentages at various fixed frequencies. For absorbers to function properly, the fabric must allow sound waves - at all frequencies - to pass through as close to unimpeded as possible for the absorbing materials to do its job. The fabric also has to maintain its shape, prevent the absorptive material from seeping through, and have a pleasing appearance. I chose Innovasia’s Glam Gliteratti which has an acoustic transparency of 95% at 500hz and a slightly sparkly white finish which helped make the room appear larger. The Rockwool was sourced from HomePro, a Thai warehouse store similar to Home Depot. The wood from RPK, a local lumber yard. The fabric was sourced directly from Innovasia. Most of the rest of the materials were ordered from Lazada - which is a Thai version of Amazon. I used a 4x8x3/4 sheet of plywood and two saw horses as an indoor workspace. It’s pretty hot and humid here, and I wanted to be able to work in my air conditioned Livingroom. Fortunately, the entry way and dining room together were long enough for me to cut down the 6 meter boards. I had considered buying a powered miter saw, and in retrospect, I probably should have done so. But I owned a perfectly good Ryobi circular saw and a full compliment of batteries. I used some extra wood to create a fence to allow me to make proper 90 degree cuts. Then, Rick and I started cutting the six meter boards down to the necessary sizes.
Once all the cuts were made, we built the frames. I had purchased a corner vice to make squaring and drilling the corners easier. Each joint was glued and brad nailed. Then pre-drilled and screwed together with #8 2" deck screws. I rounded the corners a bit with a rasp so the fabric would lay better. Completed frames were placed on my front patio. It took a couple days to build them all with Rick’s help.
After that, each frame - one at a time - was brought back into the house. Plastic landscape fabric was used on the back side to hold the Rockwool in place. The problem was that fabric was woven, and when cut and pulled, it tended to unravel into a plastic mess. So each edge was cut, then folded under, and then stapled to the back of the frames with Arrow T50 staples.
 Once the backing fabric was stapled on, the frame was turned over and the Rockwool batts were installed. The Rockwool 330 came in 1200x600x75mm (roughly 24x48x3") and some of the batts needed to be cut down to fit the frames. I used a large bread knife for that task. 6" frames used 2 layers of Rockwool and 3" frames used 1. While it is non-toxic and not as itchy as fiberglass, it was recommended that Rockwool should be handled with gloves and breathing protection. So we cut it outside on the patio table, and each time we handled it, we put on dust-masks and work gloves.
Once the Rockwool was in place, the front and sides of the panels were covered in white cotton batting which was then pulled around the outside of the panel and stapled to the bottom back edge. That was used to help keep the Rockwool in place, smooth out the corners and edges, and to make it harder to see the cross braces and wood imperfections through the final fabric layer.
After that, the Innovasia fabric was carefully cut to allow a couple extra inches on either side. This fabric was the most expensive part of the entire build - by far - and so it was crucial to use no more than necessary. The process is then much like doing fine furniture upholstery. First, one end of the fabric is rough stapled to the back of a short side. The fabric is then gently stretched the long way to the other short side, and rough stapled to the back edge. Then the sides are gently pulled to shape and carefully rough stapled to prevent pulling or bunching. After all the sides are rough stapled, the panel is flipped over onto its face and each edge is gently pulled tight and stapled every half inch or so. (I used more than 10 boxes of staples to complete all the panels.) Corners are very tricky, but the Warp Academy series had a video specifically about cutting and folding corners that was pretty easy to follow. Then the excess fabric is trimmed, a small hook is screwed into the center of the top and rubber feet are stuck on the bottom to prevent the panels from sliding on the tile floor.
 The wall mounts were simple L brackets made from 1x3 lumber cut to 2.5" (for the 3" panels) and 5.5" (for the 6" panels) to maintain the proper air gaps. A hook is screwed into the top of the horizontal piece 1/2" from the edge, and then they were screwed to the walls at the center point of each panel. Another piece of 2.5" or 5.5" 1x3 is placed on the floor to act as a block for the bottom of the panel. The panel is then mounted by running a zip tie through the hooks on the mount and the panel top.
Before installing the side wall panels, I taped the window closed with white duct tape. The window seals are not tight on any of the windows in this house, and I wanted to be sure that nothing crawled in and built a home behind the panel. Once that was done, I used some of the old Auralex foam to fill in the window cutout between the glass and the security bars to prevent the glass from rattling. After I placed the first two 6" side panels, I ran another round of REW tests. The window rattle completely disappeared. Some of the higher frequencies began to smooth out, but they were still present due to the ceiling reflecting off the tile floor. Next, I installed the three 6" rear wall panels. REW showed this to be the single largest improvement. A huge amount of the low end problems began to disappear. The large peaks and troughs between 60 and 250hz began to even out and the room reverb time dropped to around 3/4 of a second. Next, I installed the corner bass traps and back filled them with bails of the same cotton batting I’d used on the panels. Another huge improvement in the low end. Next came the ceiling cloud and the oriental rug I had brought over from my old studio to cover the tile floor. This also made a huge difference, although this time in the midrange and room decay time. With the ceiling first refection point properly addressed, and with the rug and the cloud preventing the floor from reflecting the high end back and forth off the ceiling, the midrange and high end flattened out. The room decay time was now around 440ms. My best case scenario target had been between anything below 300, so I was pretty happy to be that close with 2 more panels to go. Finally, I installed the 3" rear sidewall panels. I also closed the door and stood the fourth corner panel up covering the corner. Here are the before and after REW room captures; the left pair full range 20-20khz, and the right pair looking at the bass range from 20-500hz.
Before Treatment - 20hz-20khz Before Treatment 20hz-500hz
After Treatment - 20hz-20khz After Treatment 20hz-500hz That final test showed a decay time of 320ms, and the room was relatively well controlled down to around 40 hz. Is it perfectly flat? Hell no. The reality is that no small room that isn’t purpose built is ever going to be a flat as a studio designed by an acoustician and constructed as a room inside a room. But it is now very useful and my mixes seem to translate pretty well. I also use a set of VSX headphones to check my mixes in different studios and in a club and car emulation. I had planned to use Sonarworks to touch up a few small issues, but thus far, I haven’t thought it necessary. My reference mixes sound amazing. I hear things I’ve never heard before and the spatial dimension of the sound is far superior to my old room. On the other hand, I can really hear the serious problems in many of my old mixes. Oh well, the past is the past. I’m confident that the room is going to be more than useful here - and it looks nice too. I used app controlled LED lighting on the corners of the cloud and the main overhead light. I added an LED strip to the top edge of the cloud to give the room a nice glow. I'm pretty happy with the overall look and feel of the space.  Thailand Studio Prep - March, 2026 In November and December of 2025, I disassembled my entire music studio and began prepping all my equipment for a trans-Pacific voyage. I make a habit of keeping boxes for my equipment (some of my friends think I'm a hoarder!) which proved very fortuitous. All my keyboards were packed in their original boxes along with humidity control packs, and the boxes were wrapped in plastic. (Shipping containers are not waterproof and it's not uncommon for rain to get inside) The modular wall was disassembled and each individual module was wrapped in anti-static (pink) bubble wrap. (Thanks for the advice regarding anti-static wrap to the good people at Synthesizers.com!) The cabinets were wrapped in packing blankets and then in plastic wrap.
The good folks at Global Relocation handled my shipping from Los Angeles to Thailand. They had a 20ft shipping container delivered to my house on January 2. I packed all my belongings personally, but I hired a local moving crew to help me load the trailer. They helped me wrap my couches and entertainment furniture in packing blankets and kept a running tally of the number of items being loaded. On the morning of January 6, a trucking company hauled the trailer from my driveway to the port of Los Angeles.
My container arrived on February 24. Everything was intact. A crew unloaded the container onto a number of smaller trucks, and they then unloaded everything into my house. It took about a week for me to figure out what goes where - and to realize that I brought too much stuff!  Shortly thereafter, studio construction commenced. I had planned to build the acoustic panels before the equipment arrived, but all my tools and my measurement microphone were in the shipping container (DOH!), so that didn’t happen. I basically had 5 weeks to settle in and relax. Scott was here for a long week. Another group of my friends (and ex-clients) came in for a couple days as well. Then my friend Rick, from both my music engineering and Burning Man worlds, along with his girlfriend, came into town for a few days in March. They also stayed here and Rick helped with assembling the framing for the studio broadband absorbers. Most of the materials for the acoustic treatment were relatively inexpensive. However the acoustically transparent fabric used to cover the absorbers was quite costly. I should have ordered some from Gilfords of Maine before I left and brought it over in my shipping container, but I was too busy to spend the time to figure out how much I’d actually need; and I had assumed that fabrics would be less expensive here. That turned out to be generally true, but not for specialty materials. Ordering fabric from the states was going to be a massive headache between costs, shipping delays and Thai customs. I found an acoustics contractor in Bangkok that arranged for me to purchase the fabric I needed from a Chinese factory they used. They handled all the transportation and customs issues and in less than a week, I had enough fabric to build all the absorbers - at a cost of just under $2000. The total cost of all the materials, lighting and delivery charges for the entire studio build, and the electrician's work (more on that below) was just over $3100, less than 1/5 of what it would have cost to purchase just the custom built acoustic panels in the US. One major snag turned out to be electrical. Fortunately, when I looked at the house, I noticed that there were only two wall sockets for the entire bedroom I was planning to convert into my studio. I had assumed that because my equipment - other than amps and monitors - don’t use much power, that two 20a lines would be sufficient. However, out of caution, and assuming that electricians fees were comparable to those in California, I negotiated a clause in my lease agreement that if the power in the studio was insufficient, the landlord and I would split the cost of any necessary upgrades. What I didn’t know at the time, was that despite all the sockets in the house being 3 conductor, nothing was actually grounded. This is apparently how most properties are here. Instead of running proper grounds, all the breakers in the main panel, which is located in the dining room (inside the house) are GFIs so they trip very quickly. As such, every time I touched metal on a device, be it my computer, or TV, or a knob on my stereo system, I became the ground. I got a mild shock if my feet were touching the tile floor. Nothing dangerous, more like a slight tingle, but pretty damn annoying. The bigger problem was going to be in the studio. Some of that equipment would be running on 220v/50hz and some on 110v/60hz. That created a serious risk of ground hum and - worse yet - potential electrocution. As it turned out, the main breaker panel wasn’t really up to the task of running the entire house and the pool - let alone the equipment I planned to install. On a very hot Saturday in early February, before my container even arrived, I was running 3 or 4 of the 6 air conditioners in the house, plus the pool motor. I heard a sizzling sound, smelled electrical burning and a few seconds later, the whole house went dark. The main GFI breaker had failed. It didn’t trip, because it didn’t detect a short. One of it’s buss contacts literally melted. After several panicked calls back and forth with my agent and the landlord, she agreed to send someone to see what was wrong. But instead of an electrician, she sent a handyman. He correctly diagnosed the failed breaker, ran to a local hardware store and bought one, installed it, and the house came back to life... for about 2 hours. Turned out he hadn’t sufficiently tightened down the buss board screws, which then arced and melted the buss board, basically frying the entire panel. Of course, this all happened on the hottest day of the year (thus far). I spent much of that day in my swimming pool... Later that evening, a proper electrician arrived. He was a really great guy and we got on surprisingly well. However, he spoke very little English and I spoke even less Thai. Google Translate is pretty good for normal conversations, but try to communicate anything technical and the results are pretty much useless. Regardless, I was able to communicate my concerns with the panel and lack of grounding. He agreed that the panel was insufficient for the house and that it should be replaced. He also agreed that grounding would be required as a matter of safety in the studio and the media room. He kludged together a temporary fix so that I could run my kitchen and a few air conditioners and said he’d be back the next day. However, the following day was a Sunday; and as it turns out, the village in which my house sits doesn’t allow workmen on Sundays. So we pushed back to the following day. On Monday, he brought a new buss bar for the panel, and drilled a six foot copper rod into the ground on the side of the house. That was then wired into the breaker panel and it seemed that all my problems had been solved. Note that the landlord had paid 100% of his fees to that point. I tipped him a few hundred Baht, and showed him a photo of what I was planning for my studio installation. He said something in Thai about his doubts that the room could handle it, and gave me his personal phone number... Smart guy! In early April, I’d completed building and installing the acoustics panels, the ceiling cloud and the lighting in the studio. I’d taken acoustic snapshots of the room beginning when it was empty and then as panels were placed, and the cloud was suspended, using a test mic, my RME interface and REW (Room EQ Wizard). I was pleasantly surprised by the printouts of the finished room acoustics. I used a switched, surge protected, power strip plugged into one of the wall sockets for the 220v side, and another switched, surge protected, power strip into the other wall socket that was connected to my power converter running the 110v side. I used red electrical tape on every power cord or wall wart that needed 110 and the power strips that were on the 110 circuit. I also purchased a fire extinguisher for the room just in case. I decided to carefully turn things on, one device at a time, to be certain the room could handle the power requirements and to make sure I hadn’t plugged something into the wrong circuit. I turned on the converter and it fired up normally. I used my meter to check the power and stability on both circuits and everything looked good. I then started turning on devices on the 220v side. First, the computer and the three video monitors. Each came online just fine. Then my RME audio interface (it runs on 220 or 110) and, again, all good. Then I turned on the two MR 816 audio interfaces (they only run on 110) and they fired right up as well. Then I turned on my Barefoot 02v2 powered studio monitors. So far so good. But before I turned anything else on, I decided to have a listen to some of my reference tracks to see how the room sounded. I also wanted to see if the speakers would draw too much power and pop a breaker. About 25 seconds into the first track, the entire room went black. Not just the wall sockets, but all the lighting as well. I came out to the breaker panel and was stunned to see that the breaker for the room was still closed. This isn’t good... Out of an abundance of caution, I turned the breaker off and went back inside to listen, and smell, for anything burning. Nothing. Just a dead dark (hot) room. I called my agent and told him to let the landlord know we had another power issue. I then called the electrician myself. He agreed to come over the next afternoon. It’s one thing to see a picture of my setup on a phone; it’s quite another to stand in the middle of it all. As he walked into the room, his jaw dropped open, and then he laughed for about 20 seconds. I showed him that the power sockets and lights were dead, and that the panel breaker was still in. There was no current draw on the output side of the breaker either. So he went in search of a break in the wiring. This is a relatively old house. The master power comes in from the street to the attic, and then through a Thai version of Romex through the attic to a hole in the ceiling above the breaker panel. Romex is pretty beefy wire, and can easily handle 50 amps at 220 volts. It drops down into the panel housing, through a meter, and connects to the main power buss. That buss feeds the individual breakers for each circuit. Each of those is then connected to more Romex that goes back up into the attic and runs to the individual rooms. While a few circuits are inside the concrete walls, many of them come down through holes in the ceiling corners, then into flat conduit which runs along the wall corners to the various light switches and power boxes. The bedroom that I converted into the studio had a large LED light in the center of the ceiling that was switched from a light switch on the wall. It also has two small LED light bulbs in the ceiling over the head of where the bed used to be that were powered from a switch on one of the two wall socket boxes. The Romex came down from a hole in the corner of the room, into flat conduit, which then ran along the floor, then up the wall, first to the left wall socket box, and then from that to the second wall socket box with the light switch. The electrician went up into the attic to see what had happened. He came back down with a look that was one half horror and the other half amazement. He had taken pictures on his cell phone to show me what he found. Had he not done so, I probably wouldn’t have believed it... One side of the Romex from the main panel was wired directly to the input of the main LED ceiling light. The other side of the Romex was connected to the wire that ran to the wall switch (inside the concrete wall) which appeared to be somewhere around 14 to 16 gauge wire. (It was hard to tell the gauge from the photo, but it most certainly wasn’t bigger than 14 gauge.) LEDs don’t draw very much current, so while that certainly wouldn’t pass code in any western country, that wasn’t a really big issue. What was an issue was that from the center ceiling light, they used 16 gauge wire to run to the other two ceiling lights. Then, from the last light, they ran Romex down through the conduit to the two power socket boxes on the wall. Both power boxes were on the same (badly wired) circuit! 16 gauge wire is generally safe for only about 10-12 amps at 110 volts. It should never have been used between 2 runs of Romex that eventually ran to a 20 amp 220 volt circuit. The electrician found that the 16 gauge wire between the lights had literally melted. Not just the insulation mind you, the actual metal wire had melted. Fortunately, it didn’t actually short (so the breaker didn’t trip) and it didn’t start a fire. Recall that we didn’t think that the existing breaker panel was sufficient to run the house even before the studio equipment was installed. At this point, I became insistent that it either be upgraded or supplemented with a second breaker panel. The landlord was initially resistant, but after she spoke with the electrician, she chose the latter. A second 50 amp panel was installed above the initial 100 amp panel. The electrician then disconnected the wall sockets in the studio and used the existing Romex to connect only the ceiling lights. For the wall sockets, he ran two brand new grounded 20 amp circuits using Romex through the ceiling, down conduit attached to an exterior (!) wall, and then through the wall to the existing power boxes in the studio. The media room and the studio are the only rooms on the new breaker panel along with the pool motor. This way, I can run all 6 air conditioners in the house without overloading the first panel, and the studio, media room and the pool without overloading the second. After this was all completed and cleaned up, I started the power-up process again. This time, everything is up and running as it should. I only have 11 amps running on the 220/50 side and 8 amps running on the 110/60 side, so I’m using about half of the available current. Now for the fun part. Despite what it said in my rental contract, the landlord initially refused to pay for the electrician’s work on the studio. He had been very cool, and I didn’t want him stuck between me and the landlord. So I told him I’d pay it and asked him how much the total bill was. I was expecting a significant amount. Anyone who has ever paid an electrician to run a new circuit in a California can expect - at a minimum - a mid-four figure bill. The bill here, for the new panel, all the Romex, the conduit, and labor, was 2400 Baht. That’s roughly $75. I gave him a 300 Baht tip and a few beers to take home with him. My agent made good on reimbursing me for ½ of the 2400 Baht. BIG News - January, 2026 I retired from the practice of law in December of 2025. On January 8, 2026, I move from Tarzana, California to Jomtien, Chon Buri, Thailand. I brought my studio equipment, and a number of other personal possessions, with me in a 20ft shipping container. I've always had a dream that “someday” I’d retire and have a nice home music studio, near a tropical beach, where I could just make music for my own personal enjoyment. Barring any unforeseen issues, that day should be some time in early Q2 2026. I first came to Thailand in 2002 to work on a film project with my good friend Gary Wood. To say I had a fantastic time would be a gross understatement. At the time, and for many years thereafter, we regularly discussed moving here “someday.” In 2004, I met my (now ex) wife. My legal career had taken off, and a few years later, her career in the entertainment business would do so as well. So we weren’t going anywhere. Gary’s “someday” happened around 2011. He moved here, then after a few years, he met Anong, an amazing young Thai woman, and married her. They live in a beautiful condo overlooking the Pattaya Bay. They really are the cutest couple I know. In December of 2024, as my marriage was ending, and at Gary’s insistence, I traveled back to Thailand. I spent 3+ weeks here over the New Years break, and was reminded just how much I loved this place. I started to think that “someday” might be a lot closer and more realistic than I had previously considered. With things being as they are in the U.S., and the fact that I wasn’t getting any younger, I decided to start researching what was involved in leaving the U.S. for Thailand. To say there’s a lot to consider is an understatement. The first issue one encounters is that going somewhere for a vacation is very different than actually living there. So many logistical issues need to be resolved - getting the necessary Visas, opening bank accounts, getting a local telephone number, long term housing, learning the language, moving one’s possessions (my music studio equipment is - shall we say - somewhat extensive), and arranging all the permits required to bring my cat into the country with me. Lots of research, lots of paperwork, not an insignificant amount of time and money... I also wanted to be certain that I could actually tolerate living here. I’ve always been a “type A” on-time, get it done now (and perfect the first time) type of guy. Thailand is far from conducive to any of those traits. Things happen here when they happen. “I’ll be there at 5:00pm” actually means “sometime between 2pm and midnight, or maybe tomorrow.” Going to dinner with a group of people will - pretty much always - involve someone’s order coming out 20 minutes after everyone else’s; and dessert might just come out first. For the most part, construction quality is far from what I’ve grown to consider even minimally acceptable by western standards. For example, walking down the sidewalk requires constantly watching your feet. It seems no two pieces of concrete are at the same elevation here, and it’s even possible that a piece of unmarked rebar may be sticking up out of the ground. Most doors and windows don’t seal like they do in the west. All I can say about the electrical grid is that it’s amazing the entire country hasn’t burned to the ground. (More on that later.) Traffic is insane, and I’ve spent time on the 405 at rush hour! Most people get around on motorbikes - what we call scooters. Traffic signs are really just a suggestion - which makes for some very interesting “one way” experiences. It also seems that some laws apply to foreigners, but not to Thais. Because of all of these things, I had a lot to evaluate - mostly about myself. I was going to have to learn to “relax and chill” - and accept - many things far outside my normal comfort zone. With all that in mind, I decided to return in April of 2025, during the rainy season, to see if I could actually do this without going insane. People say that Thailand has two seasons; hot and wet, and hotter and wetter. As a California boy, accustom to a “dry heat” this was also going to be a real challenge. I returned for three weeks in April, 2025. I was here for Song Kran, the Thai water festival. Imagine if everyone you pass on the street had a water gun or a bucket of water and you were everybody's target. Traffic comes to a standstill. It’s kind of fun for the first day or two, but here in Pattaya it lasts for five days. So we drove up to Bangkok for the last few days to get away from the craziness. Bangkok was - as always - awesome. A truly fantastic city. You can find anything you could possibly want there. You can buy a Rolls Royce or a Ferrari in a mall. The food is as good as anywhere in the world and the variety is without equal. Delicious street food to 3 Star Michelin restaurants; it's all here. One morning, a few days after we got back from Bangkok, I was sitting on Gary’s 21st floor balcony overlooking Pattaya bay. We were sipping iced tea and reminiscing about some of our exploits from decades past. I asked him - “so what do you do here all day? What’s the first thing you think about when you wake up in the morning?” His response: “I think about what I want for lunch.” He also spoke of daily gym visits, swims, and/or walking trips with his wife; hanging out with friends (an amazing and diverse group of Ex-Pats I’ve subsequently become quite friendly with), visiting the islands, and basically doing whatever they felt like doing in the moment. Side note; one of the Ten Principals of Burning Man is “Immediacy.” So that really struck a chord in me. I was in! I decided to move in November of 2025. I was just finishing up a case I’d been working on for eight years. After prevailing on Summary Judgment and again in the De Novo appeal, I had the joyful experience of getting my five brave and resilient clients paid in full, with a not insignificant attorney's fees award for me! So it seemed like the perfect time to make a move. I started winding down my practice, made arrangements to get my equipment shipped over and purchased a pair of high end power converters so I could use my significant collection of vintage electronics on the local 220v/50hz power. I applied for the necessary Visa for myself and the required import license for my cat. I began getting my California house ready to convert from my primary residence into a rental property. I returned to Thailand in September, a week after what was supposed to be my 24th and last Burning Man, to lease a house. Unfortunately, the windstorm that arose on Saturday of Build Week destroyed most of my Burning Man camp’s infrastructure, and made the rest of my Burn incredibly disappointing. (I fully intend to return for the 2026 Burn to erase that memory.) Unfortunately, the Thai real estate agent I’d retained to find me a house totally dropped the ball. Full disclosure; I was dealing with a western agent working for a Thai company. Despite communicating with him almost weekly as to my requirements and travel plans, he left on vacation the day before I arrived and - apparently - didn’t tell anyone else in his office I was coming or what I was looking for. A very nice Thai woman tried to pick up the pieces over the next week, but none of the six properties she took me to see were anywhere close what I had told them I was looking for. The trip, while frustrating, wasn’t a total loss. I did get a number of other logistical issues sorted; including setting up my Thai bank account, confirming my Visa status, obtaining a local phone number, and I was introduced to an individual who could help me with Thai customs and transportation of my equipment from the local Thai port to my home. But because I didn’t have a house yet, the actual move I’d hoped to accomplish in November was going to be delayed. Obviously, I fired the first real estate agent, and a few days later, I was introduced to a young and seemingly very capable agent at a small agency in Pattaya. We spoke almost daily after that. A week after I returned to the U.S., he found a house that seemed to fit my requirements to a tee. It’s about 10 minutes from Gary’s condo in Pattaya, and a 2 minute walk through a security gate onto a beautiful beach. Unfortunately, I was too busy to commit to another 26 hour flight back to Thailand just to see one house. So Gary drove over to look at it for me. It had some construction issues, and desperately need a coat of paint, but the location and all the other major requirements were solid. It did have a few “unique” logistical issues, including a recently evicted illegal tenant, but those were overcome in a couple of weeks as well. I made an offer contingent on my inspection and booked a return flight in November of 2025. I came back for 8 days, saw the house and one other, negotiated a long term lease, paid a deposit to the owner, and my plans were back on. Target date, January 6, 2026. (Yes, that is precisely why I picked that date!) Added bonus, I got to spend my New Year’s Eve with my Los Angeles crew at an amazing party I helped to produce. As it turned out, most of the mechanics of the move were relatively easy. The landlord had the entire interior of the house painted for me and a few of the really bad window seals repaired. I sold and/or gave away a pretty significant amount of my “stuff.” I rented a 20ft shipping container and hired a freight company to get it from my house in Los Angeles to the port of Laem Chabang, Thailand which is about 25 miles from my villa. Because my music studio equipment took up quite a bit less than the full container, I was able to bring - essentially cost free - many of my personal possessions that I otherwise would have sold off (e.g., leather couches, kitchen ware, clothing, tools, bedding, etc.) as well as my home entertainment system and vintage high-end music rack. The two parts of the move that were stressful were packing my stuff (I now understand why people pay companies to pack their belongings...although in my own defense, I didn’t break a single thing during the move!) and getting the necessary paperwork for my cat. The Thai government requires clearance from Thai Customs, and both the Thai and U.S. Departments of Agriculture to import a live animal into Thailand. Failing to have everything in order can lead to refused entry, long quarantine holds or even destruction of the animal. The clearances require several documents from the Thai government, the animal’s principal vet and an original embossed document from the U.S.D.A.. The issue was that - unbeknownst to me at the time - the U.S.D.A. document is only valid for 10 days. Between the 26 hour flight, and the fact that Thailand is 14 hours ahead of Pacific Standard time, leaving Los Angeles on January 6 means arriving in Thailand on January 8. There was an unplanned delay in getting the documents back and forth to the U.S.D.A. because of the New Year’s holiday. Much sweating of bullets ensued... But the document finally arrived on the morning of January 5, 2026. So on the evening of January 6, 2026, Scout (in her carrier) and I, with 3 large suitcases, boarded a flight to Bangkok, Thailand. My friend Scott was also on our flight as he had some personal matters to attend to in Bangkok after which he planed to stay with me for a week. I was happy to have him along as I was nervous as hell, mostly about Scout. Once Thai Agriculture signed off on Scout (which took about 2 hours), and we cleared customs, we hopped in a car and headed to Jomtien. Scout had been in her carrier for 28 hours, and was pretty freaked out. She used her litterbox, and then found a bed to hide under for a day or so. I put out some food and water, which she covertly consumed during the night, and came out to explore her new house the next day. I’m happy to report she has adapted well to being here and seems to really love her new environment. As do I! My house has five bedrooms and it was completely furnished. But because I was planning to use one bedroom for a studio, another for my media room, and I was bringing my own bedding for the master, I had to remove 3 sets of furniture to make room. There were also a set of cheap vinyl couches in the Livingroom that had to go. The landlord didn’t want me to trash them, so over the next few weeks, I acquired some huge plastic storage bags, wrapped everything up, and stashed them in the back yard and on the side of the house. Interestingly, the back yard here is only used for washing and drying clothes; the pool and a nice patio are in the front of the house behind an iron gate. The fourth bedroom is a fully equipped guest room with a king bed and its own bathroom. The fifth bedroom still has a queen size bed and a bathroom, but I’m using it for storage of my equipment cases and my extensive tool collection. (Another of our Ten Principals is Radical Self Reliance... I like being able to fix things!) I had a few weeks to settle in before my container would arrive. I spent most of my time walking around my new neighborhood. On one side of my village, through a security gate, I have Dongtan Beach and a long beachfront road filled with restaurants, bars and shops of all kinds. On the other side, past the security guards shack, I have a T-Intersection with a market, restaurants, bars and all manner of stores. There's a fantastic little French pastry shop right across the street that makes some amazing breads and other goodies. There are three (3!) 7/11s within a 5 minute walk. (BTW, 7/11s are much larger than they are in the states and one could easily live out of their frozen foods cases for under 100 Baht.) Finally, the prices here are - for the most part - far less than they are in the U.S.. Foreign electronics, musical equipment and imported goods can be costly, but local produce, locally manufactured goods, utilities and labor are massively less expensive then they are in the states. Getting around is cheap! Bolt (the Thai version of Uber) is far less expensive than in the states. A car between Pattaya and Bangkok will generally run less than $35. For getting around locally, Bolt also has scooter taxies that usually cost no more than a dollar or two. As for healthcare, it's amazing both for the level of care and the cost! In early March, I caught an intestinal bug. (I'd thought it was a food issue, but that turned out not to be true.) After a couple uncomfortable days, I decided to visit the local hospital's emergency room. Note this was a local government hospital, not one of the large private (and amazingly luxurious) hospitals that are far nicer than most hotels I've stayed at! The wait to see a doctor was about 25 minutes. She ordered blood work and an ultrasound which was handled in the next hour. I then saw the same doctor who gave me the diagnosis, a few prescriptions to ease the symptoms that were also filled on premises. The total bill to see an ER doctor, tests and three prescriptions was 1460 Baht - which is roughly $45. And that is without local insurance! I told most of my friends that this move was either going to be the greatest thing I've ever done, or the dumbest thing I've ever done. So far, greatest easily wins! OCTOBER 2025 - Update A while back, I preordered an Oxi One sequencer in their initial sale. I'm still very satisfied with my Cirklon, but there was something about the Oxi that looked intriguing from a live performance perspective. It turns out I really liked it! There's an ease of use and immediacy to it that I really enjoy. So when they announced the MkII version, I - again - preordered one and sold mine on the used market. I'm just starting to dig into the MkII now, but I'm also in the middle of prepping to move my whole life, so I haven't had the time to dig in yet. I expect it will be a lot of fun and a great writing and performing tool. I also decided that, before I left the US, I should update my guitar rig and monitors. These things are stupid expensive in Southeast Asia! I've been using a Line 6 Helix for more than 10 years and - TBH - I love the thing! They recently announced the new Helix Stadium, which will - so they say - offer substantially more memory and improved sonics. I've puled it out and noodled with it a bit. It actually does sound noticeably better then my old Helix, which I've now sold. Only issue is the adaptor/interface to my Variax is a separate module that isn't available yet. I'll grab one as soon as they are available and that should really place this thing in my hold forever column. I've been using my Mackie HR824s since (gasp!) 2002. I really like them, and I know how they sound which makes working on them easier. But they are a bit long in the tooth and as I was planning to use "real" studio acoustics, I wanted some new monitors for my new environment. I listened to a dozen or so different pairs from all the majors and, to my ears, the Barefoots sounded the most accurate. Because I was going to be in a relatively small room, the 01s felt like overkill. Fortunately they had just released the second version of the 02s which had better low end extension and seemed to be the perfect choice for my space. Of course, you never know how something will sound in your room until it's there; and I wasn't able to buy multiple sets and then ship the ones I didn't pick back to the US. I rolled the bones and bought a new set of Barefoot 02V2 at a reasonable price, broke them in on white noise for 24 hours to make sure they were working, and then packed them in the shipping container. Finally, I had an opportunity to pick up a new Gibson Les Paul at a very reasonable price. I'm really a "strat guy" but I've owned dozens of guitars over the years. Oddly, I've never owned a standard shaped Les Paul.(I owned 2 SG bodied Les Pauls in my distant past, but sold them off decades ago.) Nice guitar. I'll bang away on it when I get settled. February 2024 - Update I've acquired some new toys since my last update. :) In March of 2023, I purchased an ASM Hydrosynth Desktop Module. It has a completely different sonic flavor than everything else in my room - which is great. It took some time to "grok" the thing, but now I'm getting some really nice sounds out of it. It can be really quite gnarly which is a great addition to my sonic palate. It still has a few minor bugs, but nothing that's a deal killer for me. I quite like it. In November of 2023, I snagged a perfect condition 1010 Blackbox, mostly with the intent to use it as a sample player for live gigs. I'm hoping to have enough material to start playing out in 2024. I've been mixing some original material and a few remixes - my favorite being a deep house remix of King Crimson's Elephant Talk - into my DJ sets. Youngsters have no idea that it is, and older prog fans are gobsmacked... LOL Just a few days after I bought the Blackbox, Korg dropped the price on their 2600m to a price point I couldn't resist. So I snagged one. I think they sold out in two days... I have a love/hate relationship with 2600s. In 1979, I worked for Jean-Luc Ponty. One of my jobs was as Allan Zavod's (RIP) synth programmer. His lead instrument was an Arp 2600. It sounded lovely (when it worked), and he played it with such great finesse. Allan really was a lovely guy, one of the funniest people I've ever known, and a spectacularly gifted musician. But Arp 2600s were not built for the road. The were built as educational tools and for studio use. The thing was so totally unreliable and required work every single stop on the tour. It's oscillator tracking calibration was all over the place. Then again, I didn't buy ine to take out of the studio and, thus far, it's been great. Really does sound like a vintage 2600, but takes up less space which was most welcome as I don't have room for another large synth. And then, just a few days later, my long awaited Cirklon V2 became available. I'd been on the waiting list since October of 2019. I'd found a great condition used V1 in late 2020 and have gotten pretty good on the thing. The V2 is quite a bit more capable than the V1, and there are plans to expand its capabilities even more. I sold my V1 in one day after placing a local add. The price difference was minimal and way less than it would have cost me to purchase the Cirklon V1 to V2 upgrade which just became available last week (and which I'll pass on to the buyer if he wants it). The most consequential and most used new gear I've acquired since my last post is a pair of Slate VSX headphones. TBH, I thought they were a gimmick; that I'd try them out and end up returning them. Nope - these things are great! I have a small treated room, but it's impossible to get real bass extension in here. Getting the bottom end of my mixes right has been a real chore. Not anymore. I just finished mixing and mastering a track for a female artist I met at a party a few months back. I saw her again at a social event a few weeks ago and she mentioned she had a track she wanted on her upcoming album, but her producer just couldn't get the mix right and she asked me if I'd give it a try. Sure... The track is a mix of R&B and HipHop, two genres I don't have much experience with. And HipHop bass and drums are really crucial d own low. I had my mains and my NS10s working, and used the VSX for getting the bass right and trying the mix in different environments; in a club, a car and several other sound systems. When I sent her the first rough, I thought she's have concerns with the bass, but nope, her notes were more focused on where the vocals sat. (She liked them a bit louder than I. Bumped the lead vocals 1.5db without changing the 2 Buss chain settings at all and she was over the moon. Mastered using Ozone and added a bit of loudness and some air and done. The VSX really is a stupid cheap way for a bedroom producer to have a solid monitoring experience. And they saved me $3K as I was thinking of buying some Barefoots. Not anymore. On a less than happy note, I've been going through HELL with my Moog One. I bought it back in October of 2018 out of the first batch they released. There is so much YES about that thing, it could be my desert island synth. The sound and the UI are spectacular. But it's buggy. REALLY buggy. Most of the bugs I could deal with, but it's main flaw (at least my units main flaw) was it's propensity to freeze notes when played over midi and occasionally from the keyboard. I'm not really a hands on keyboard player, and my main use case has always been sequencing from my DAW or my Cirklon. But it never worked right. After the 1.5 firmware upgrade, many of the other bugs were resolved. It finally tracked properly. But it still locked up every minute, so for the last 6 years, it's been an expensive paperweight. Moog had me ship it back east in mid 2022, and they replaced the keyboard. They then said it was fine and sent it back. It wasn't. The hanging notes from the keyboard were gone, but it still couldn't play over midi without hanging voices. I was then told it would take a firmware update to fix my problem - which they confessed was a known issue - but I was also told it would be 8 months to 2 years (maybe!) for the next firmware update. That didn't sit well, nor did I feel any better when Moog was purchased by inMusic. I recently met a couple Moog ex-employees, including a master tech with extensive knowledge of the Moog One history. I will respect the confidentiality of what he told me (which wasn't very confidence inspiring) but he told me that the issue with mine wasn't firmware at all; it was most likely a defective voice assigner board. Over the last 3 weeks, I was trying - unsuccessfully - to reach someone at Moog to discuss this new info, but I couldn't get a return call or an email response. I got pretty heated with my Sweetwater rep who sold me the thing and who has been kept in the loop all these past 5+ frustrating years. Either Sweetwater's call to Moog or the tech's reaching out to them (or both) got someone's attention. I was contacted and asked to ship the unit back to Ashland - on Moog's dime - which I did today. Based on my discussions with a management level employee, I'm hopeful that they will either finally fix mine, or they will replace it with a brand new unit. Fingers crossed! And I have been told that inMusic does plan a firmware update in a few more months that should add some new features and fix some of the other firmware related bugs. I'm probably done buying new synths for a while - unless Behringer releases a desktop module of their OBXa for me to pair up with my OB6. I'd snag one now, but I just don't have room for another full sized keyboard. STUDIO UPGRADE 2020 Well, 2020 was quite a challenge on many levels. I hope you all got through it with a minimum of personal loss. Please get vaccinated as soon as you can! In trying to keep my sanity as we were all locked down, I decided to take some time to make some music of my own. In doing so, I ran headlong into some equipment problems, a just-by-chance opportunity to acquire a piece of equipment I'd been lusting after for since 2017, and the time to put together a new, more efficient, workflow. The 2021 Studio Upgrade had begun. My first stroke of good (great!) luck actually occurred in late 2020 when I found a early version Cirklon sequencer for sale on a modular synth board I follow. (Used to be called Muffwiggler, but the PC Police got involved and it's now called ModWiggler... gah!) Cirklons are - in my humble opinion - the best hardware sequencer ever made. Admittedly the UI takes some learning, but once one wraps one's head around the Aux Events concept, there is very little this box can't do. 64 tracks, 5 Midi Din ports, 6 USB Midi ports, and a Break-out Box with 24 jacks that can be arranged in various configurations of CV and Gate outs, Envelope Generators, LFOs, Midi CC ports, and even CV/Gate inputs to record with. Not surprisingly, the waiting list for new Cirklons has exceeded 3 years. Covid and the current world-wide shortage of ICs hasn't helped either. Finding one used (in decent condition) usually entails paying multiples of the price for a new one. Last December, I found one, with a CVIO and a BOB, for just under what a new one would cost. Work's perfectly. Great communication with the seller. Couldn't have been a better on-line buying experience and made me one very happy synth nerd! I found a nice comfortable position for it between my keyboard and my Raven, and it's now the centerpiece of my studio.  I was sooooo ready to start cranking out some deep house, but then, as luck would have it, technology got in my way... (Ah... the marvels of modern technology)
As I finally started recording real time compositions where the Cirklon was sequencing my modular, my Analog RYTM MKII Drum Machine, multiple layers of my Moog One, and several other instruments, all at the same time, I started noticing audio dropouts in my recordings. These are the ultimate scourge of the recording process. After about a month of troubleshooting and tearing out what little hair I have left, I discovered that my trusty (but annoying) Steinberg MR816s were the problem. While they actually have always sounded pretty good, these interfaces have been a real PITA since I acquired them back in 2011. They were advertised as being "zero latency" - meaning a person could record in real time without the normal delay caused by converting analog audio to digital, sending it through the computer, and then back out so you can listen to the audio while recording additional tracks. They were also advertised as being able daisy-chain together, so in my case, two 8x8 interfaces could provide seamless 16x16 ins and outs. However, Steinberg conveniently overlooked (?!) disclosing that they couldn't do both simultaneously. Either they could daisy-chain, or a single unit could monitor with zero latency, but 2 daisy chained units couldn't monitor with zero latency. As you might imagine, this caused me and quite a few other Steinberg customers some serious consternation. When confronted with this misleading advertising, Steinberg initially denied having done it. But advertisements were everywhere, so they then backed down and promised a software fix for the problem. (The old "check's in the mail" trick...) After repeatedly promising a fix was coming soon, a little over 3 years later (coincidentally just beyond the statute of limitations for false advertising...) they announced they couldn't fix the problem. This was infuriating, and if I had been running a pro studio, I'd probably have filed a class action lawsuit before the statute ran. But this is just a hobby, I was really busy at the time, and the number of times I really needed more than 8 ins at one point were pretty minimal, especially after I sold of my percussion rig. So I swallowed Steinberg's BS and kept using them. But I will NEVER buy another piece of Steinberg hardware again. But Steinberg wasn't through with me just yet... The MR816s run through firewire. I had months of headaches getting them to work under Windows 10. Had to swap out the firewire card in my DAW a couple times before I found one that worked reliably. But when Steinberg discontinued the MR816s, they kept providing updated drivers ... until November of 2019. People with Mac's had their interfaces become instantly unusable under the updated OS. We Windows guys were OK, for a while, but the lack of support finally caused them to become unusable as the firewire drivers in Windows wouldn't maintain a solid connection, hence the audio drop-outs. So... after a 10 year run, it was time for a new audio interface. After years of following the audio engineering boards (e.g. Gearslutz, recently renamed by the PC Police as GearSpace...), speaking to other engineers and musicians, and chatting up people at AES and NAMM, I decided that my next audio interface would come from RME. I made this decision based on two main criteria: 1) Their stellar reputation for high quality, great sounding, fully professionally supported products; and , 2) the fact that they have a multi-decades long history of supporting their products - including their discontinued products - with the most rock solid drivers. After my Steinberg experience, this is what I wanted. I chose the UFX+ as a "more than I really need/future proof device and I'm more than happy with it. Sounds great, rock stable, no dropouts, thunderbolt ready, and superb tech support (which I needed when I couldn't get it to work through ne of my USB ports). In addition, their TotalMix software is amazingly versatile and, while I do all my routing in Cubase, it's nice to be able to have multiple configurations set up for other environments. (It really helps in Ableton as well!) (Note, I have a love/hate relationship with Steinberg's Cubase too. But I've tried pretty much every DAW out there and it is still is the most complimentary to my personal workflow. I just wish they'd stop breaking features, or releasing half baked enhancements, do some proper QC before releasing updates, provide some actual tech support that knows more about its products than its users... I also have a copy of Ableton Live that I bought so I could work with many of my DJ friends who use it religiously. I have to say that it has been pretty easy to learn, and their updates don't seem to be half baked as Steinberg's often are. But I still prefer the overall experience using Cubase). An extra added bonus is that the UFX+ has 2 sets of ADAT lightpipe I/Os, so each of my old MR816s can still be used as 8x8 interfaces ported through the UFX+. I now have 28x28 analog I/Os, and have one of the old MR816s mounted in the rear rack on my synth wall, connected over lightpipe, so there's no loss in audio quality from running long TRS snake cables from the back of the room to the console position. Adding all this extra I/O required me to add 2 additional 48 point patch-bays. I now have 2 in a back modular wall rack and 2 in the front DAW rack. But everything is normalled to my studio's main workflow (e.g. OB6 L/R normalled to Patch-Bay 1, positions 1 and 2 which are then normalled out to UFX inputs 1 and 2). If I need to change something, I can patch around the normals and literally have anything patched to anything. I do have to say that designing the patch-bay layouts made my brain hurt more than once. Trying to come up with the most useful configuration took a few weeks, and on one occasion, I woke up in the middle of the night with the realization that I had a better way of doing something I'd already started wiring. For a guy who used to build video edit bays, and has 45 years of signal flow experience, this was a bit depressing... But it's done and it works GREAT! While I was going through this process, I decided to swap out my old midi interface as well. I've been using a MOTU Midi Express 128 for years. It's been pretty solid, but it has had issues dropping off the USB hub and they are known for having issues passing Sysex, which meant that more than once, I've had problems doing program data dumps and updates. I decided to make a change to a more modern interface and chose the iConnectivity MioXL. What really sets this interface apart from the others was its ability to send and receive USB and Din Midi over RTP which cut way down on the number of midi cable runs I needed. In addition, the Cirklon upgrades are going to allow for RTP as well, and when that becomes available, it will greatly enhance the ease of sequencing multiple instruments simultaneously, as well as the tightness of the sync between the instruments. One caveat about iConectivity; they use a program called Auricle to configure the ins and outs. Once you wrap your head around how it works, it's brilliant. But the documentation for it is pretty much useless. I'm clearly a reasonably tech savvy guy, but after reading the "manual" (such that it is) I couldn't figure out how to get things configured no matter how I tried. I needed a tech support guy (who was awesome bye the way) to walk me through it. But once the AHA lightbulb went on, I see how flexible Auricle can really be. Like my audio routing, my midi routing can now - quite literally - go from anything to anything, so I can literally play any instrument - or combination of instruments - from any other instrument or controller in the room. The final piece of the studio redesign was spending a day updating my Raven batch commands. I'm using a Slate Raven MTI2 as a touch screen DAW and VSTi controller. But what really makes this device more than just a touchscreen is Slate's Batch Commander software. Admittedly I've had some issues using it, but many of those I must admit have resulted from my operator error. Combining Batch Commander with Cubase's Track Presets is a seriously powerful system and has made it easy for me to set up specific repeated tasks that get executed from a single button. This makes recording far easier and much faster. And actually fun from time to time... A few examples from simple to more elaborate: I have a button on my Raven Recording Layout named "MIC" which, when I push it, loads my must used mic channel and effects configuration. The vocal mic chain I most often use involves a Slate ML1 mic into my UFX interface feeding a mono audio track with the Slate mic software, some other effects loaded on the track VST inserts, and sends to 2 effects tracks, a delay and a reverb. All my interface inputs are normalled through the patch-bays and named in Cubase. The Mic is normalled to Interface 1, channel 9. A Track Preset has the mic input source assigned to an audio channel with the slate mic software on VST insert 1, a VST channel strip on insert 2, and 2 sends set to named effect tracks. 2 other Track Presets have the effects loaded in my usual initial ways and named to correspond with the aforementioned mic channel sends. The Batch Command first loads the effect track presets (so the mic channel sends can be routed), then loads the mic track preset, names the track "Vocal Mic" and arms the input. I just have to push the "Mic" button on the Raven and it's ready to go. Another example involves my master controller to Cirklon to MiniMoog configuration. The patch sends midi from my Master Keyboard (Novation SL61MkII) to my Cirklon, which sends midi to Cubase, which sends midi out to the MiniMoog. Audio from the MiniMoog comes back into Cubase. The Cirklon uses instrument definitions to send outs on specific channels or through the CV breakout. I then use one track preset to recieve the master keyboard midi and send it to the Cirklon; another to recieve the midi back from the Cirklon on a specific USB port and midi channel number that matches the Cirklon's MiniMoog instrument definition (so I can record the midi if I want to edit later) which then sends the midi out to the MiniMoog. Another track preset creates a mono audio track that is fed from a specified input on my audio interface (which is normalled to the MiniMoog audio out) and which has my specified VST comp/EQ/Efx chain preset for the that track. I programed a Batch Command to load the Track Presets in a specified order, set the audio and midi ins and out accordingly, and arm the respective channels. There's a button on my Raven Recording Layout 1 named "MiniMoog." I press it, count to 10(ish), and its all ready to go. My usual synth guitar setup involves audio in from a Helix over spdif, 6 individual midi channels (1 for each string) from an AX50 guitar to midi converter, all in a folder track, and each sent to its own channel in a 6 patch multi in Omnisphere, with some additional controls from a FCB1010 midi pedalboard routed to both the Axon and Omnishpere. Setting up everything takes quite a bit of time and, to be honest, I'd always miss something and spend the next 1/2 hour trying to figure out what I did wrong... by which time my inspiration to actually play something was long gone. By assigning various pieces of the master patch as Track Presets (e.g., each midi channel from the AX50 is its own separate midi track, input source from AX filtered so it sees just the specific string, routed to a specific layer of the Omnisphere multi with track names and colors, etc.), and then building a Slate Batch Command to load the presets in specific orders and set buss routings as desired, I just hit one button on the Raven named "Guitar Synth" and in a few seconds, the whole patch loads and I can hit record and start playing. Full disclosure, I've lost even more grey hair getting everything to work as intended. I've spent unknown hours with Slate's support, but unlike Steinberg, they are amazing - in a good way, even on weekends! They have even gone so far as to show me how to create my own "custom clicks" that I use constantly. Jamie from Slate is what anyone in artist tech support should aspire to be. Super knowledgeable about his products, able to explain various "outside the box" ways to make things work, and very understanding of rubes like me who sometimes need things explained more than once... Admittedly, I was a bit sad when, after getting comfortable with the Cirklon, I sold my Social Entropy Engine, the sequencer I've been using for the past few years. Engines are really special little sequencers, and are superb for live performance use. I decided to sell mine because, while I expect they will increase in price due to scarcity, I really wanted someone to enjoy using it and I'll be working almost exclusively on the Cirklon from now on. As of today, the system appears fully operational. Now, let's see if I can make anything interesting...
0 Comments
|
How this all started...

I've been making music since I was seven and have been fascinated with synthesizers since the age of 13. In the late 70s, my father co-signed my first bank loan which allowed me to buy a Moog modular IIP synthesizer from Dan Wyman at Sound Arts in Los Angeles. It was built in two portable cabinets from a number of older modules they no longer needed - some having been previously owned by Paul Beaver and Dr. Robert A. Moog himself. The IIP is a part of the famous system used by Georgio Moroder to record the Donna Summer disco hits in the late 70s.
I was a professional musician, equipment salesman, synthesizer programmer and recording engineer until I left the music business in the early 80s due to my being disillusioned by the "business" of music. Even after I left the business, I stayed involved as a hobbyist and at one point, I had a full on 16 track studio in my one bedroom apartment. The 1994 Northridge earthquake ended that little venture. In 2000, I discovered modern electronic music at Burning Man. I jumped back into music - semi-professionally - and built a constantly evolving home studio. My current recording system is built around Cubase Pro 11 and a pair of MR816 audio interfaces. I mainly use a large 5U analog modular system including my Moog IIP and another 110 spaces of modules from Synthesizers.com, Free State Effects, Moon Modular, Crysp and STG. I recently acquired a Moog One as my main analog polysynth. While I can play a keyboard, I do most of my actual playing on a guitar that I have augmented to provide polyphonic midi control which I distribute throughout my studio, both to play modern midi-based instruments and to convert to control voltages and gates to play my modular equipment. My main guitars are a highly customized Line-6 Variax JTV69s (the Hexstainocaster), a Fender Stratocaster, and a Godin ACS-Slim. My main sequencers are a Sequentix Cirklon and a Social Entropy Engine. The Variax Hexstainocaster Project
I play the guitar. I also “play” synthesizers, although I’m a lousy keyboard player. My synth of choice is a large (!) Analog modular system built around a vintage Moog IIP I got in the 70s. My main polysynth is a sixteen voice Moog One.
Shortly after I got the Moog, I took my first step into the guitar/synth world. I acquired a 360 Systems Slavedriver which was a monophonic pitch to voltage converter. The system required me to mount a hexaphonic pickup (one individual pickup per string) on a standard guitar which was then sent to the Slavedriver. 
The Slavedriver would figure out which string was played last, what note was played, and output control voltage and trigger signals to control my synthesizer. It worked.... sort of... The pitch accuracy was marginal and the trigger response was pretty bad as well. And it only played one note at a time. But it was all that I could afford at the time, so I made due.
In 2007, I acquired an Axon AX 50 guitar to midi converter. Unlike the Slavedriver, the AX50 is polyphonic; it can play 6 notes at once (one note per string) and the accuracy - while not perfect - is far better than anything else I’ve played. 
Around the same time, I acquired my first Line 6 Variax guitar, a 700 - the top of their line at the time. The Variax was played through a PodXT floorboard. The 700 had no normal pickups at all. Rather, it had 6 piezo-electric sensors in the bridge and an on-board modeling system which simulated the sound of many popular guitars; Fenders, Gibsons, Rickenbachers, Gretches, and even a few acoustic 6 and 12 string models. Not 100% perfect recreations, but far good enough for my musical endeavors. 
I attached a Roland GK3 pickup system to the Variax which adds volume and patch select in the form of a small control box mounted on the face of the guitar. It includes a hexaphonic pickup which sends individual string outs to a 13 pin jack. Functional, but not terribly elegant. 
This system has served me very well. But as far as guitar ergonomics go, I’m really more of a “Strat” guy. And I really wanted more versatility and a more elegant solution to the hex driver installation. About 10 years ago, Parker released the Adrian Belew Signature Fly guitar. The flexibility was second to none; in addition to the normal electric guitar stuff, it had a Variax board, a Sustaniac, and a 13 pin hex output to drive a guitar to midi converter. There were 2 problems with me getting one; I really didn’t like the Parker guitar feel; and (more importantly) it was around 10 grand! 
Ever since then, I’ve wanted to create something that would give me all that capability in a guitar neck/body combo I actually liked. In 2017, I acquired a Line-6 Helix to replace the PodXT which made a significant improvement in my studio flexibility. The Helix also sounds really great and, with its extensive input/output capabilities, it works well as not just a guitar processor, but also as studio effects system. I became aware of the JTV series Variax guitars at NAMM in 2016. As a Strat guy, I was interested in the JTV69s. I was very impressed with the sound of the improved modeling circuitry and the built in magnetic pickups didn’t sound all that bad either. But the neck left me a bit cold. I did think it would make a great base from which I could build my “signature” guitar. So I decided to acquire one, and build it into a guitar I could use in the studio, and live. 
I was extremely fortunate to acquire a damaged/demo JTV69S from the awesome folks at Line 6. I didn’t think buying a new one made any sense as I was going to hack into it in many many ways and the new instrument warranty would be useless. Plus I had planned to replace the neck and the one they had available suffered from a damaged truss rod. So it was an amazing stroke of luck and saved me quite a bit of scratch.
My first task was to decide on what I wanted it to do. The inevitable answer was - everything! I wanted a performance-oriented guitar from which I could get a deep palate of sounds in addition to being a synth controller. I wanted the Variax modeling output; improved electromagnetic pickup output; a built-in hex driver system; and a Sustaniac, an electromagnetic pickup which doubles as a string exciter which achieves infinite sustain. I also wanted a more traditional (as in thinner) Fender Strat style neck. I wasn’t convinced that I had the electronics chops to get the Variax piezo pickups to drive both the modeling circuitry and a hex driver circuit. But I assumed that I could work through it with a little help here and there. Graphtech makes a product called a Hexpander which adds piezo saddles to conventional guitar bridges in order to drive a guitar to midi converter. I decided to try to use one in conjunction with the pre-existing line 6 piezo bridge saddles. In theory, it should work... 
My initial plan was simply to “Y” off the piezo outputs to the two circuits. But that quickly proved impossible. My on-line research uncovered several people who had tried this before. There was an apparent impedance and loading mismatch so that the piezos could only drive one circuit or the other. A buffer circuit was needed to isolate the 2 circuits from each other.
My research then turned to the Belew/Parker guitar. It had done what I wanted; driven both a Hexpander and a Variax modeling board from a single set of piezo saddles. I discovered that RMC had provided the hex driver circuit for the Parker and that a young guitar electronics wizard named Axel Ruddich had designed several custom circuits for the guitar. I tried to contact both. Unfortunately, Ruddich passed away some years ago. But Richard McClish from RMC was most approachable and tried to be helpful. RMC actually sold an inexpensive passive buffer circuit that should - in theory - allow me to split the piezo outputs to both circuits. 
I purchased the Hexpander from GC and a VAR001 board from RMC and set to work. And almost immediately, the challenges started...
First, I built a non-destructive break-out wiring harness so I didn’t have to damage any of the stock Line 6 piezo wiring when connecting it to the buffer circuit. 
I then attached the Piezo output connector to my breakout - which then sent one side back to the Variax board and the other to the Hexpander. When I fired it up, the hex system worked reasonably well. I don’t really know if it would have been acceptable because I didn’t spend any time calibrating the AX50 for the new driver. This is because the audio output from the modeling software had degraded far below the usability. The RMC board seemed to remove everything below about 200hz and that made everything sound terrible. Back to the drawing board... Plan B was to design and build an active 6 channel pre-amp buffer circuit. But even more problems began to arise. It would use too much power to run off the Variax power buss. And because I’d have to build it on a small breadboard, there simply wasn’t room in the guitar cavity for the extra electronics. At this point, I decided to abandon the joint piezo solution. Roland also sells GK3 pickups with a small circuit board designed to be installed inside the guitar. 
I found this solution acceptable and far more elegant than hanging a GK3 off the guitar. I decided to install a hex pickup and route the rest of the system into the body. The synth volume and patch selector controls would be mounted on the pick guard along with the LED power light. I decided to replace the stock up and down individual buttons with a single bidirectional switch for patch up/patch down.
I also wanted the hex pickup to match the color of the other guitar pickups. The Roland pickup was black and all the other pickups were white. I found that I could order a white hex pickup from Fender, but rather than doing that, I decided just to paint the Roland pickup to match. I carefully pried open the tabs on the pickup base and removed the outer cover. I painted it white using a few thin coats of some high quality enamel, and then carefully reassembled it. For function and aesthetic reasons, I also wanted to install it with the long end - with the cable outputs - on the bottom as opposed to the top. This involved reversing 6 of the 8 pins on the small connector that plugs into the Roland driver board. Using an Exacto knife, I gently pried open the pin retainer clips on the connector and reversed the string 1-6 cables so they attached 6-1. The ground and shield connector remained in place. 
I mounted the hexaphonic pickup on the top of the guitar between the bridge and the bridge magnetic pickup. Because the pickup height is relatively low, I cut down the springs used to adjust the height of the pickup and drilled a small hole in the pick guard for the bottom side spring. I also routed a small grove in the body so the pickup cable could run under the pick guard into the main body cavity. From there, it snakes through the existing internal routing into the main board cavity. I also routed some additional areas on the body for the additional controls and the rear battery compartment.

I also wanted to find a better solution for the 13 pin jack. The Roland requires a rather large square route in the side of the body, and it uses a squarish metal mounting plate which I didn’t like for several reasons. Its also not a secure locking jack. Through the VGuitar forum, I learned of a gentleman in the UK named Peter Harris selling a much smaller and more precise pre-wired 13 pin jack he calls Synthlynx. He was extremely responsive to my e-mailed questions and I purchased one from him that arrived in just a few days.
The installation is far easier than the stock Roland, requiring only the drilling of a small 5/8" hole into the side of the guitar body just above where the Variax Cat5 cable plugs in. The Synthlynx cable passed directly into the main board cavity. From there, I had to attach it to the small Roland 7 and 8 pin connectors which plug to the Roland board. This was relatively easy as Peter had provided excellent instructions including photos and the color coded pin-outs for each side. Each lead was soldered and shrink-tubed. It worked perfectly on the first try! 
The Sustaniac was far less complicated... or so I though. Alan at Maniac Music was very helpful and provided several control options, wiring diagrams and photos of prior Variax installations. I decided on a pretty extensive control package: on/off, drive, harmonic selector and a pick-up splitter.

In theory, it should have been able to run off the Variax power rails, but I couldn’t get sufficient drive; so I route a 9v battery holder into the back of the guitar and power it from its own supply.
The Sustaniac also requires that all the insulation around the pick-ups be removed so it doesn’t pick up and transfer the electromagnetic pulsing throughout the guitar circuits. (This was also one of my considerations in picking the Seymour Duncans as they are incredible at rejecting noise. I was pleasantly surprised how quiet the Variax modeling circuitry was as well.) I did that by scoring the back of the new pick guard and then using an exacto to shave off the aluminum shielding. One easily resolved problem was that in most Sustaniac installations, they provide a 1/4" jack that connects the power when a guitar cord is plugged in. The Variax jack is not compatible and I pretty much always use the Cat 5 cable out (into my Helix floorboard) instead of the 1/4" out. So I decided to install a simple on/off switch so I could turn off the battery when not in use. I also wanted to swap out the stock pickups for a bit hotter more aggressive sound. I have the basic single coil Strat sounds covered by the modeling, and so I decided on stacked humbuckers from Seymour Duncan; the Hot Rails for the bridge and the Classic Stack + in the middle. Each have coil split options which get closer to the more traditional Strat single coil sound, but I was really after a darker more aggressive tone here.
The next piece of this puzzle is the neck. I prefer a thinner Strat neck to the stock JTV. There are also some issues with string resonance coming from the area between the nut and tuners on stock JTVs. I decided that with all the other electronics work having been done, I really wanted a great neck on this instrument. I’ve played a number of aftermarket necks and find that the Warmoth necks were really top of the line. Plus they can be ordered to suit a particular player’s preference, with choices of woods, fret size and materials, neck radius, etc. I went with a standard-thin vintage/modern neck, made from quartersawn maple with a rosewood fretboard, mother of pearl dot inlays and a satin nitro finish. I chose a compound radius 22 fret configuration with stainless 6150 fretwire. I also ordered a custom headstock sticker from Rothko and Frost in the UK. The Logo is a 54 style, silver with a black outline.
The Variax neck mounting pocket is identical to most Strats, but the screw holes are slightly different. And I’m not very accomplished at lacquering over a logo, so I had a local guitar luthier do those two pieces of the puzzle for me. I did a trial initial build using the stock white pick guard. I had decided on the placement of all the new controls based on how I thought they would work, but before drilling out the new pick guard, I wanted to see how it all would actually play. Good thing because I found that I had to change a few switch positions for functionality and ergonomics. The new pick guard has to be drilled to accommodate the new components. Remember the old adage, measure twice, drill once! 
Then the real fun begins. I was super anal about keeping my wire runs as short as possible, making sure all the solder connections were solid and were shrink tubed, and that I zip-tied the wires to keep them under control. I also created 2 loams; one for the stock Variax runs and one for the GK3 components. The pot on the upper left is the Sustaniac drive control. The 6 switches across the bottom are (L>R) Sustaniac on/of; Sustaniac harmonic mix; Sustaniac coil split; middle p/u coil split; bridge p/u coil split; and synth patch up/down. Slightly above and to the left of the 5 way switch is the synth volume control. The synth driver power light is directly below the 5 way switch and the Sustaniac battery on/off switch is at the lower right.

Next, one must snake all the cables back through the front body cavity into the rear cavity. The output module must be removed so there is room to get the wires through. It is crucial that all 3 green master ground wires (bridge ground, pick guard electronics ground, and output module ground) be connected and screwed into the body. These wires are not as robust as I would have hoped and they are easily broken if care is not taken. (Note, the polarized 2 conductor white connector is for the 9 volt battery in the back that powers the Sustaniac circuit.)

Now its time to install the circuit boards. I cannot stress enough that you employ proper static control here. The Variax and GK 3 boards are each susceptible to damage from static electricity.

There are a lot of wires that need to be connected, and routed so as to take up the least amount of room. Initially, all wiring should be moved out of the way to allow for placement of the main board.
Once the main board is in place, it has to be screwed down. Do this gently! Crack this board and its game over... 
Finally, connect the Roland GK board. I placed it slightly below the Variax piezo connector where it seemed to have the most space.

The all the wires have to be carefully routed and compressed to allow everything to fit. Note that I gently routed several around and under the main board and then back up where necessary.
Do not force anything. If the cover won’t fit, try rerouting the wires again. It is also very important to leave enough space for the piezo bridge output (the 2 grey wires coming through the bridge cavity opening) so it doesn’t pinch. If it does, then the tremolo bridge will not hold tune. Once everything is in place, screw down the rear plate. 
Then it's just a matter of testing circuits one at a time. This can become very frustrating when trying to track down problems. Stay calm. Don’t rush. Don’t panic....

Once everything is working, screw down the pickguard and install the knobs. The model selector switch has a small circular surround that mounts with what feels like rubber cement. Fortunately there was enough on mine when I removed it that I didn’t have to try to find more. I had a very difficult time finding smaller control knobs that matched the Variax knurled chrome knobs. I finally found some smaller knurled chrome knobs (although they are flat topped as opposed to domed) at C.B. Gitty (part # 51-005-01) I think they match up nicely.
There is a small magnetic “tab” that comes with the Sustaniac. It is held on the pickup my the magnetic field, but it must be moved back and forth on the pickup in order to null the magnetic field at the bridge pickup, otherwise it squeals when the sustainer is turned on. This took a few minutes to dial in, but once its set, its done. Here she is: 
I am a big fan of using spiral wrap to make custom cables. I have my 13 pin and Variax Cat 5 tied together into a single (semi)manageable run.
A few things of note for anyone thinking of a project like this. One issue is that the JTV69s fingerboard extends beyond the end of the neck. The stock body cavity routing is very tight and there are a lot of electronics mounted on the pick guard. As a result, one has to remove the neck in order to remove the pick guard. This means that any internal adjustments or troubleshooting require neck removal. This is a real PITA and not conducive to optimal long-term neck to body rigidity.
The 5 way pickup selector on the Variax is very different than a stock 5 way switch. It is actually 2 parallel switches. For the magnetic pickups, each of the 3 positions has a + and - solder drilled pad and they are very small and fragile. The Sustaniac install requires it to take a parallel feed of the bridge pickup. There is very little room here and so I highly recommend careful precise soldering and judicious use of shrink tubing. In case you are wondering, YES this WILL void any Line-6 warranty! |


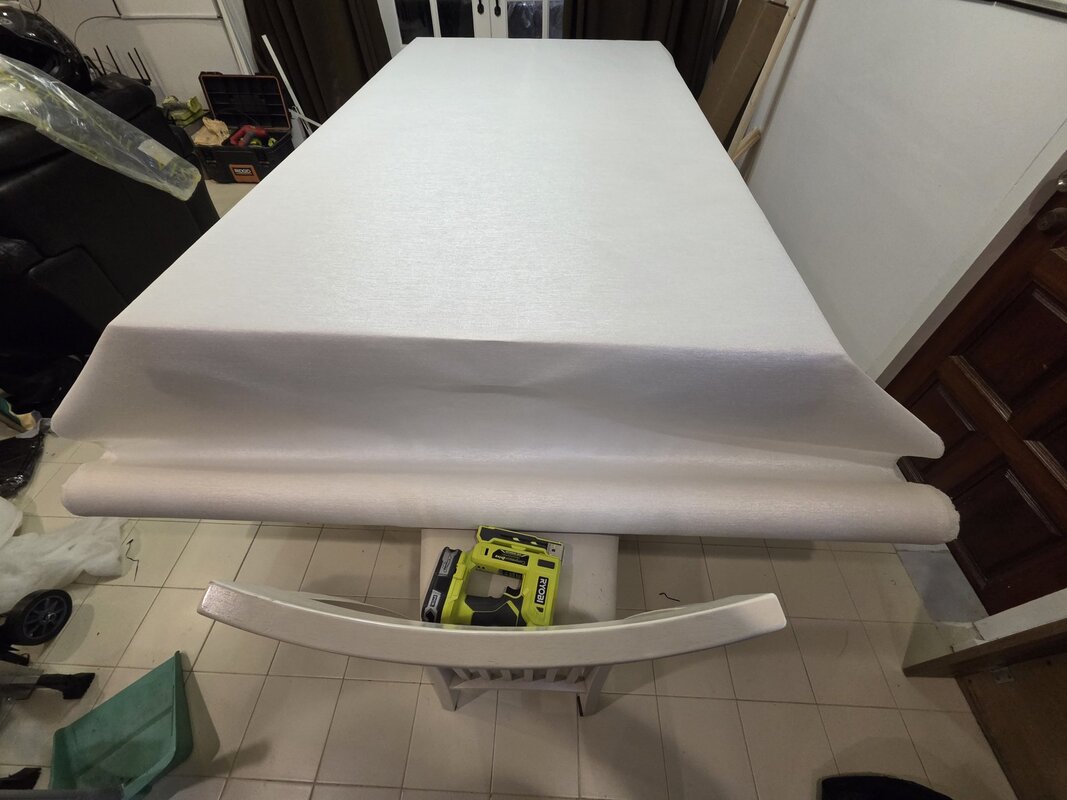


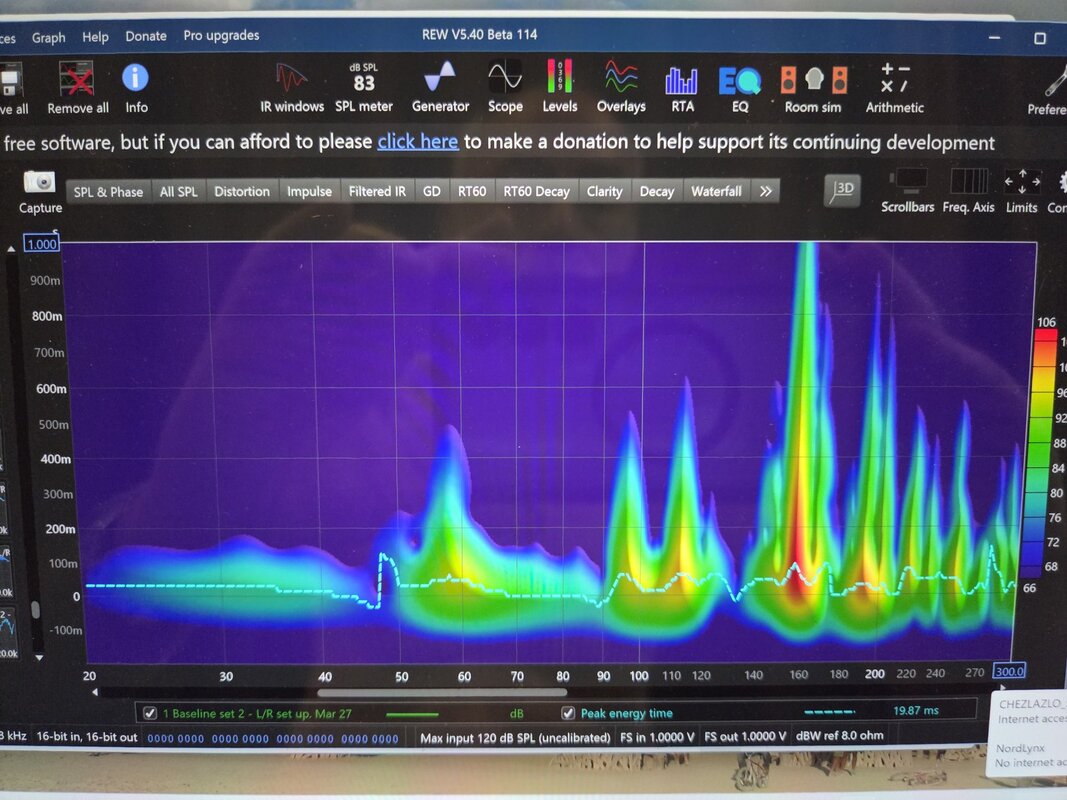

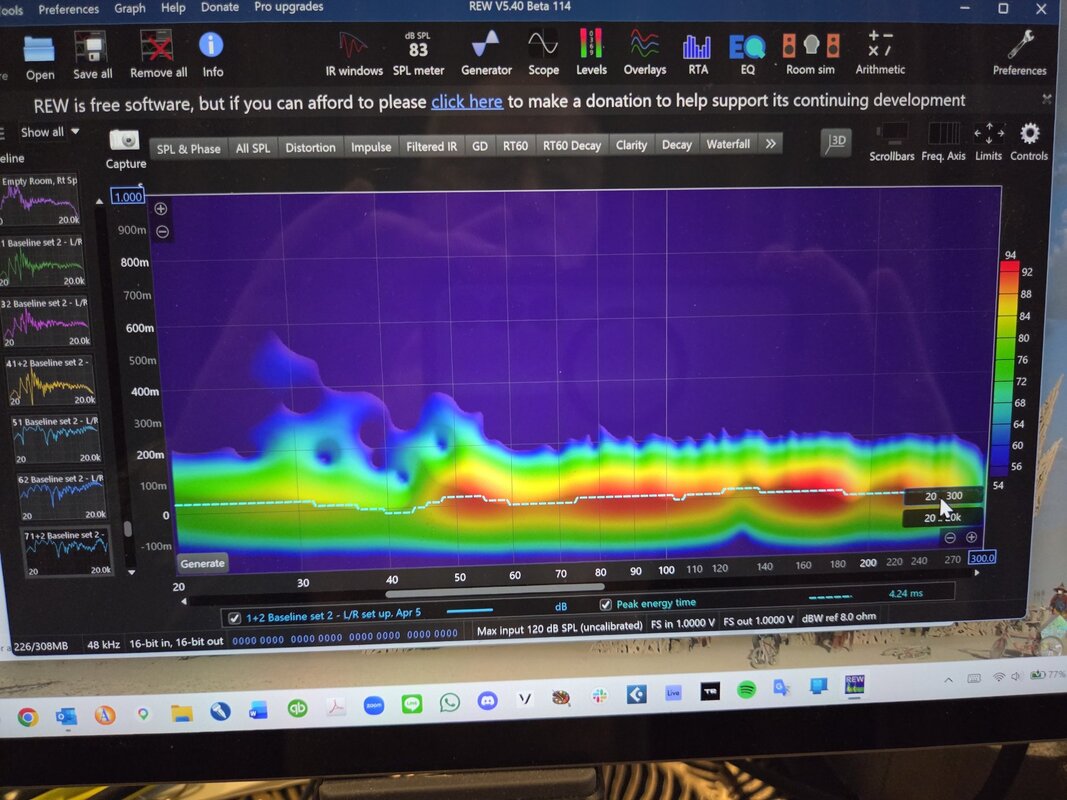
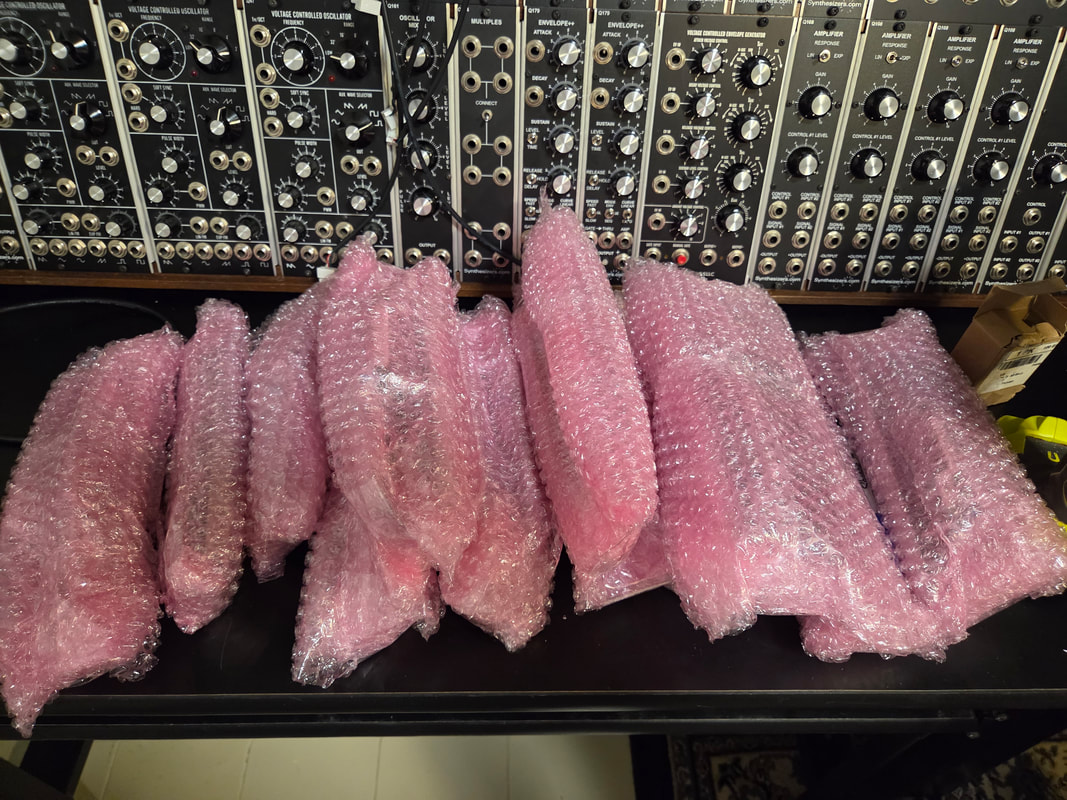


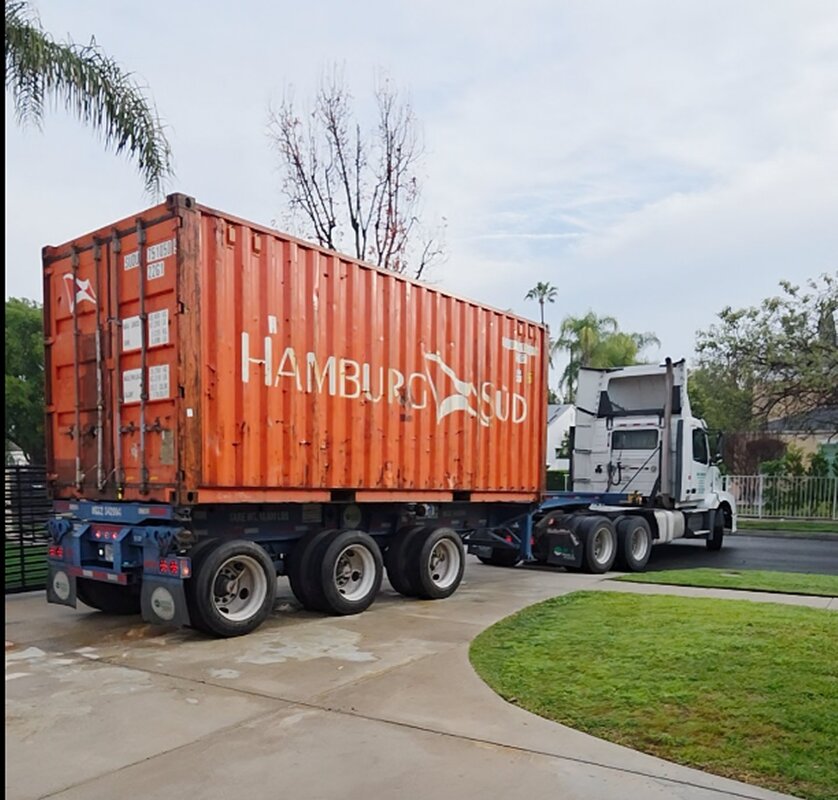


Site powered by Weebly. Managed by JustHost